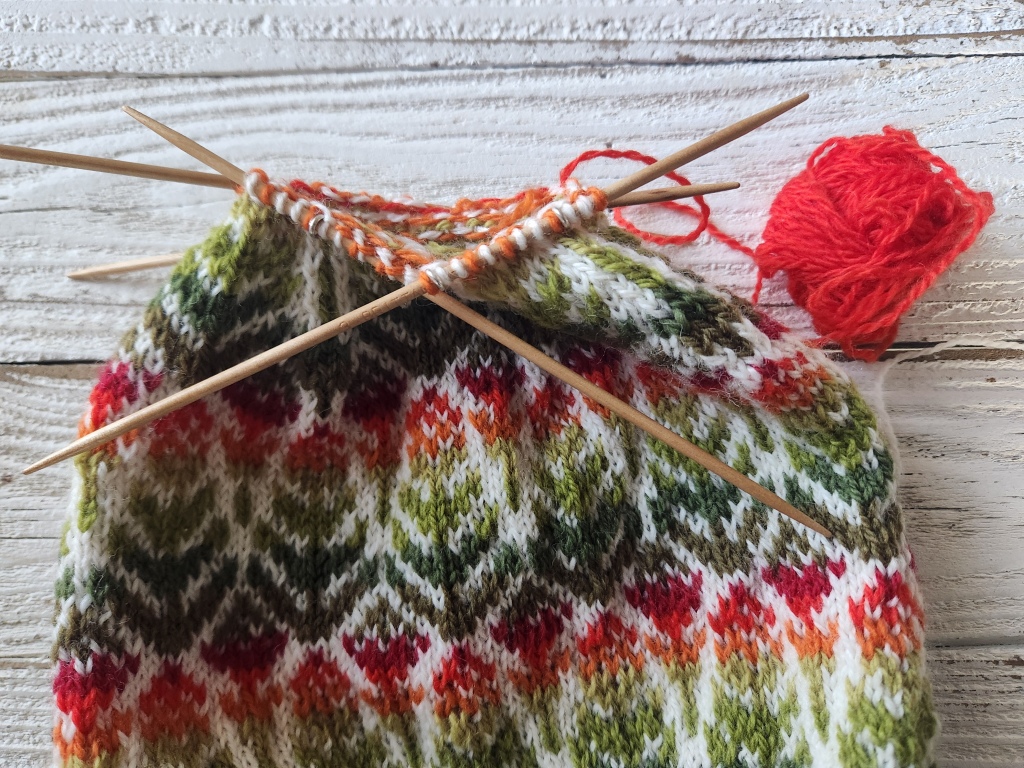
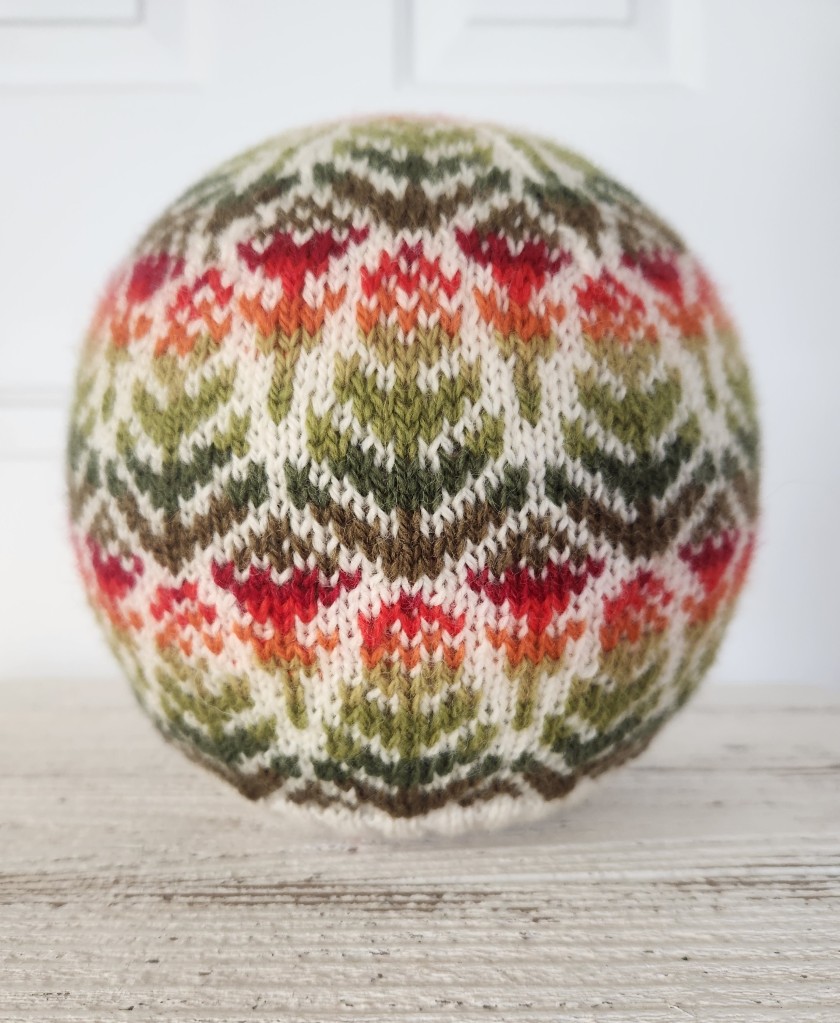
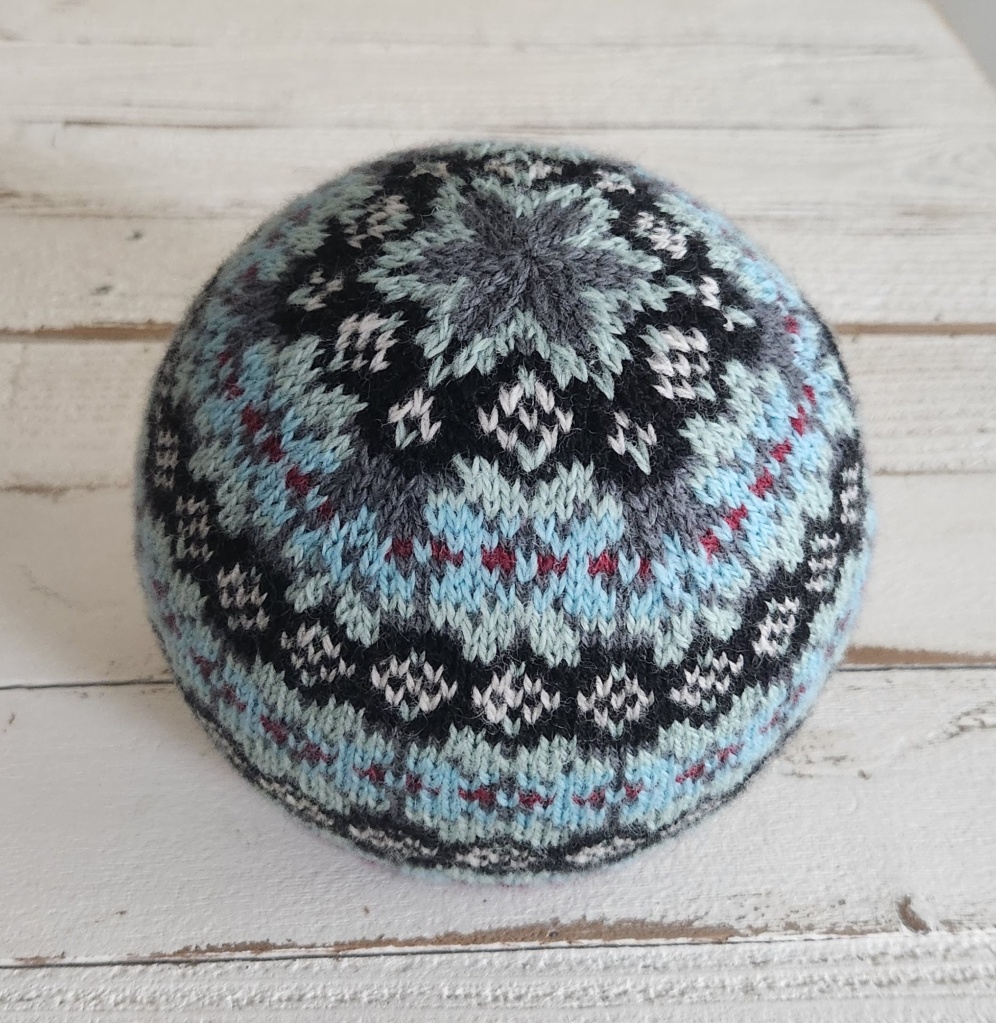
My abundance of green colored yarns inspired my newest design: Alpinia Hat. This pattern calls for 8 colors: a main color for the ribbing and back ground, 4 greens for the stem/leaves, and 3 flower colors. I made the “blooms” with red and oranges but you could use any scrap colors you have around. For the bloom colors you only need 11 yards of 3 colors each. With the 4 green colors, you only need 20 yards of each. The flowers could be in pinks or yellows or lavenders–any colors really. When substituting colors, consider keeping the values/shades close to the original pattern.
This is a basic charted pattern using fingering weight yarn. Only 2 color strands are used at a time. There are lots of color changes though and if you make this hat you will enjoy it more if you know (or learn!) how to weave in ends as you go.
Here’s the free pattern for you to enjoy. If you make this hat, please share a photo of it with me or post it on Ravelry.
I want to tell you a little secret about how I swatch for mittens… I just start knitting the pattern. Of course I know it’s important to get the gauge right but honestly to get the gauge “in the round” you need to make something the size of a mitten. As for picking colors, it’s true that you can make a little square of the pattern but if you think you’ve got the colors that you want, you could just start knitting the mitten.
This idea of skipping the swatch or having the mitten be the swatch works well with a lot of my patterns because I like to start the cuffs with colorwork. Stella Nova Mitts have very long cuffs—6 inches of colorwork before you get to the wrist. The cuffs are knitted with Size 3 needles so they are looser than other mittens that I have designed.
With such long cuffs these mitts were not designed to be practical—am I stating the obvious? They were designed to be a fun explosion of stars.
Recently I decided to sew some doll clothes for my grand-daughter’s 18” doll. I looked on Pinterest for free patterns thinking I’d whip out a few outfits in an evening. There were lots of cute ideas but most of the links were covered with ads and I couldn’t easily find the download for the free patterns. When I did find the links for the free patterns they didn’t work or the link was for something other than what I thought it would be. I’ve been listening to the podcast Darknet Diaries which is about hacking, scams, botnets, and the like. It’s a really good podcast and I recommend it but it’s made me overly cautious about opening links. So I gave up on the free sewing patterns.
This experience solidified my choice to not crowd my blog with ads. When I started writing knitting patterns I imagined that I’d give them away for free at first and then one day charge for them. I didn’t have a strong vision of where I wanted to go with knitting pattern design. I know that if I design a sweater or an other multiple-sized garment I’d probably charge for it because of the work involved. But somehow I got stuck on accessories and I can’t seem to stop. I love knitting mittens and hats!
Here’s what I get out of it: perfect record keeping. My fiber craft life has not been one of good record keeping. I didn’t label my fleece. I made yarns with unknown amounts of blended wools. I made the worst offenses when dyeing: didn’t measure dye, didn’t measure mordant, just threw it all in a pot and worked with what came out. This was my sloppy way of doing things—could I change? Yes! My knitting projects are recorded so well they are reproduce-able!
With that I give you my next Free Knitting Pattern: Longmont Hat. This hat was designed and knitted while we were visiting family in Longmont, Colorado. Enjoy!
We are back from our trip to Colorado in which we took our travel trailer and camped in below freezing weather. We were obsessed with checking the forecast and the weather was always on my mind. This is because of our solar/battery set up and it’s questionable ability to discharge in below freezing temperatures. This is really my hubby’s arena since he put in the solar set-up. I just benefit from it by being able to go “glamping”.
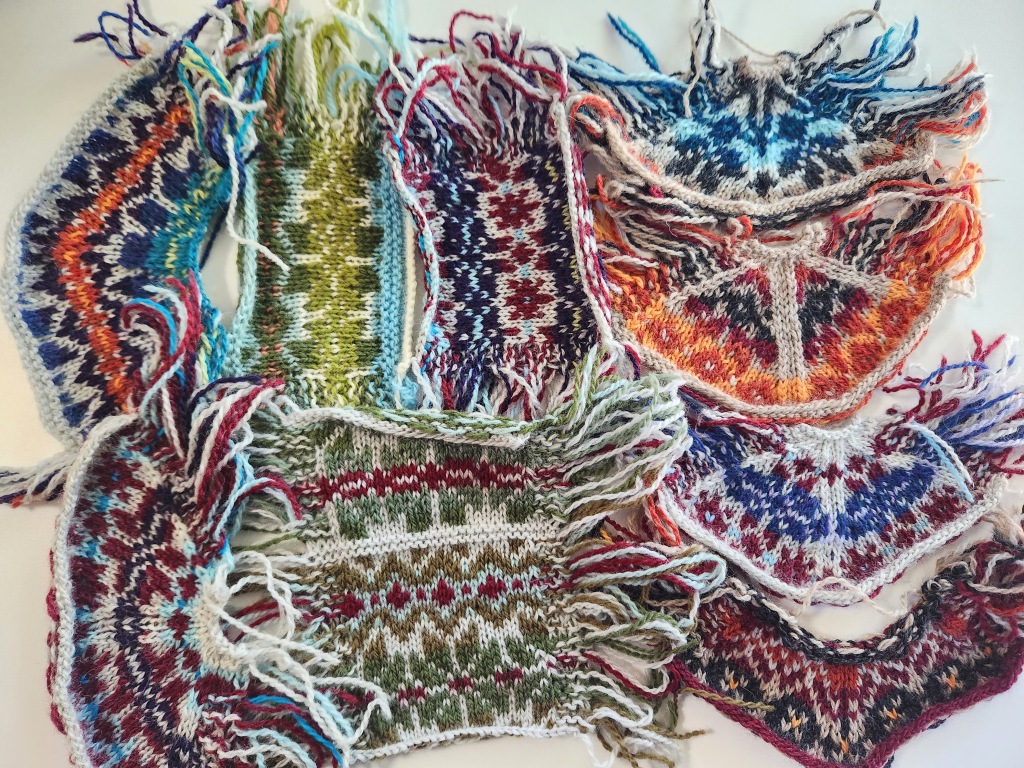
I had all the luxuries: yarn and light to knit by. I also took my computer and worked on some designs. The photo below is of all the samples I made that did not work out. I thought I’d share this mess so if anyone thinks they have trouble with choosing colors they can see I have troubles too.
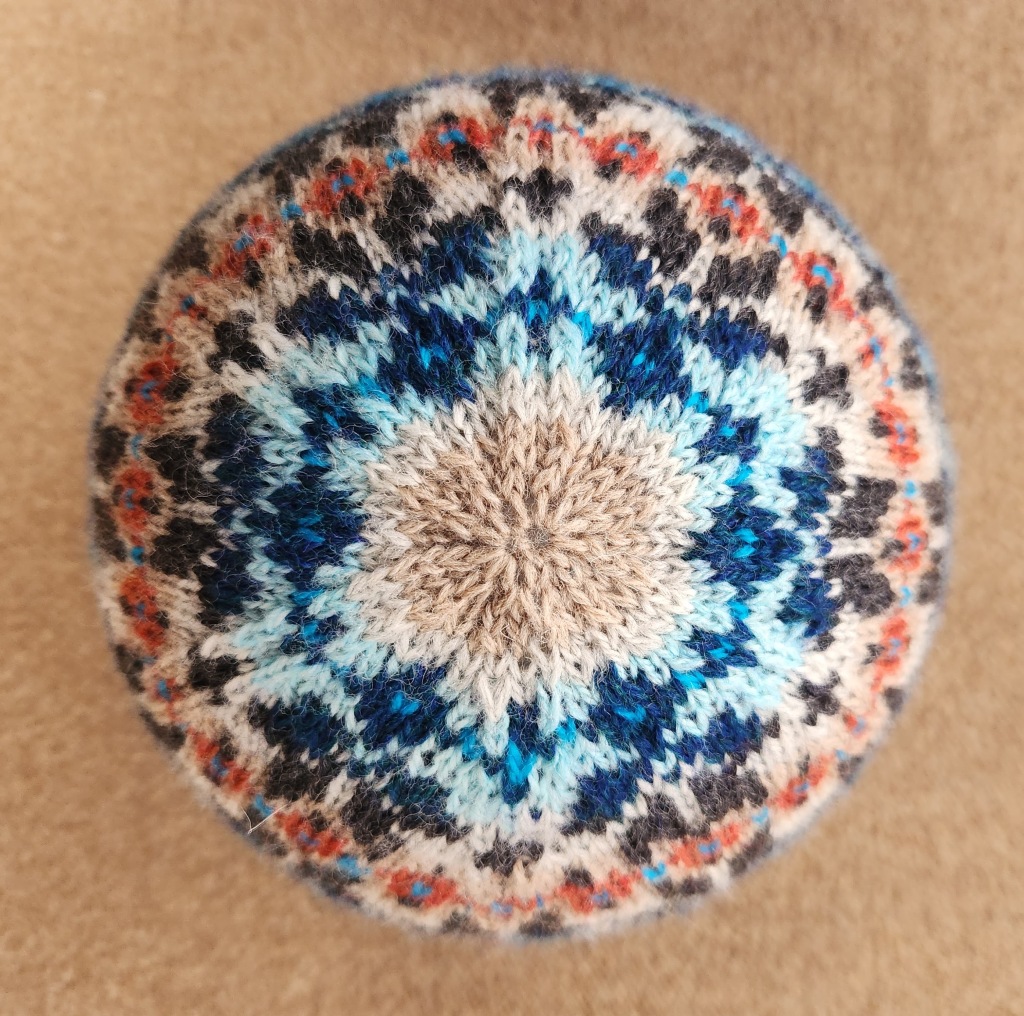
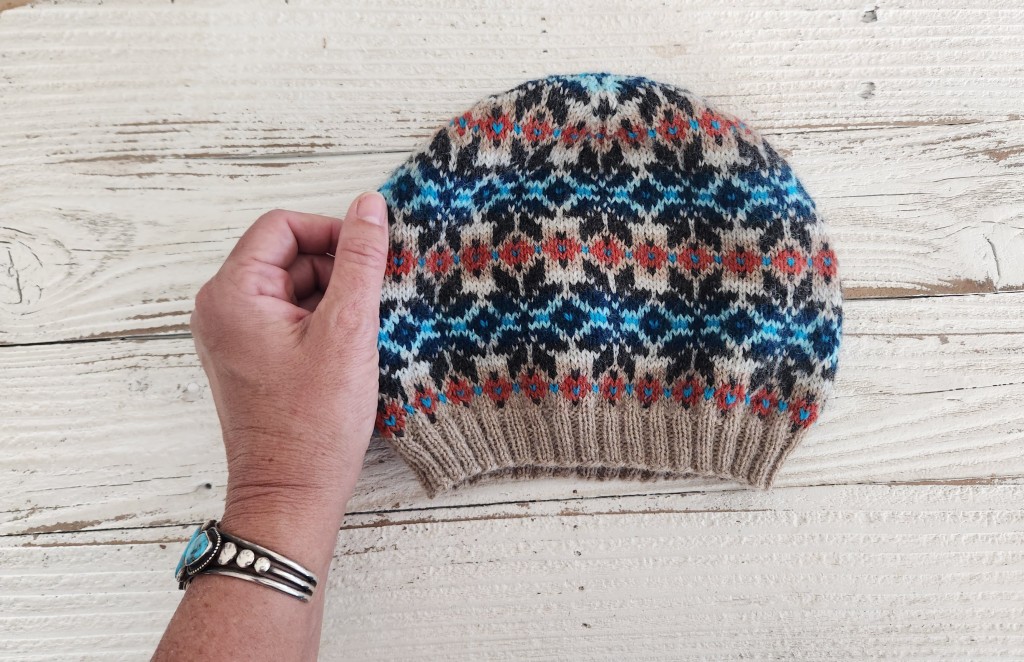
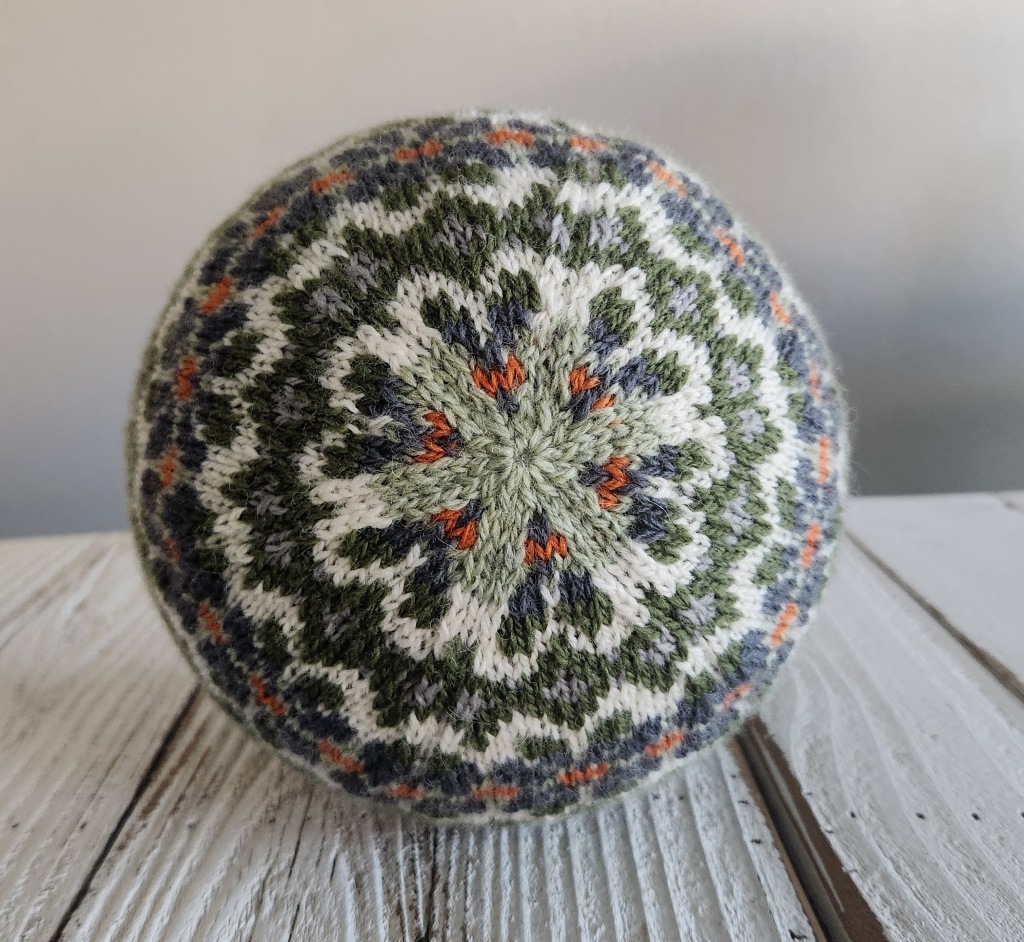
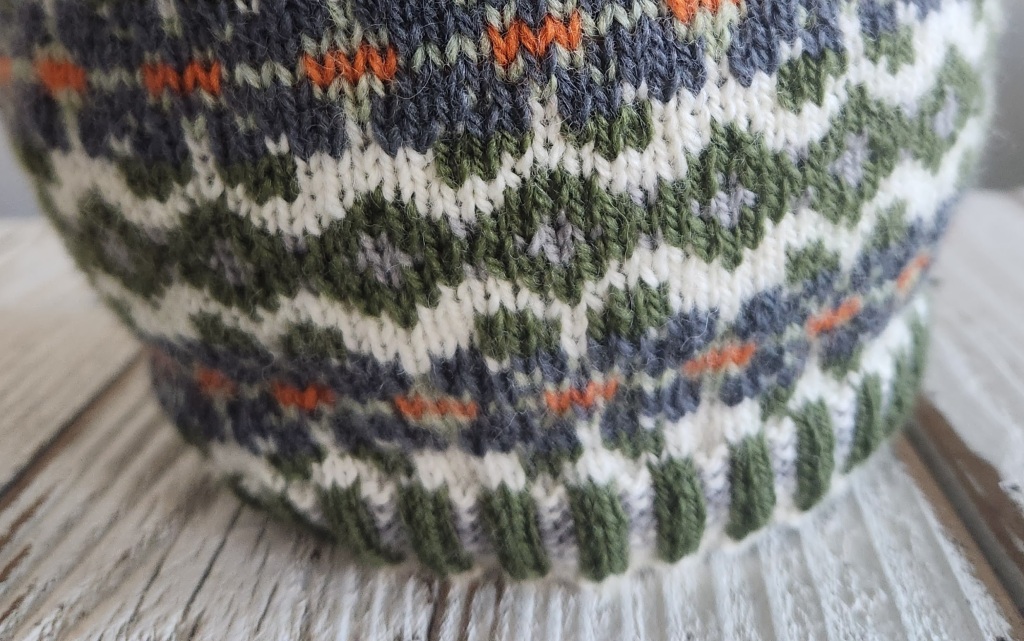
I did get a few designs to work out and I ended up knitting two hats on the trip which I will share later. The pattern that I was writing at the time of the trip has been named “Forecast Hat”. I’m posting it here for anyone who would like to knit it. I don’t typically put black into my color-work but I did with this one. And of course, because I can’t resist—a Latvian Braid! Enjoy!
I know a woman named Wintress and I think she has such a cool name. It’s like ‘winter’ and ‘princess’ combined. I designed this hat to be worked with 2 colors at a time in the classic Fair Isle style. The corrugated ribbing is knitted with size 2 needles and the rest of the hat is to be done in size 3.
In my mind there are 2 kinds of hats: one you would wear doing outdoor activities like hiking and the other you would wear chilling out like on a casual walk. When I make hats I use a size 1 needles for the ribbing if it’s meant to be a sport-style hat. Wintress is more of a causal chilling-out style so the ribbing is with size 2 needles and it’s corrugated so it on the loose side. If you make this hat you can chill-out looking like a winter princess!
This is a free pattern. If you make it please let me know either on ravelry or message me here.
I designed Hibernus Mittens with Knit Picks Palette line of yarns using these colors: Celadon Heather, Rainforest Heather, Finnley Heather, Asphalt Heather, and Lingonberry Heather.
I used with my favorite seeding pattern for the palms and thumbs: checkerboard! And of course, a Latvian Braid at the wrist because I’m super into Latvian Braids. I wrote up the pattern to share with y’all. Enjoy this FREE PATTERN.
30 years ago when I was young and basically penniless I took up quilting. My mother had given me her old sewing machine (a Bernina from the 80s that I still use!) and my grandma gave me a bag of thread. I accepted hand-me-downs from anyone who offered with the intention of cutting them up for quilting. For batting I would sometime use an old blanket. A few of these quilts lasted over the years but most were destroyed by outdoor music concerts. Eventually they ended up as padding for furniture in a moving truck.
During this time I went to a quilt exhibit featuring modern designs. All the quilts were made of new fabrics, colors were carefully selected, and the “wall hangings” were machine-quilted. I thought to myself, “What would I make if I had unlimited choices of fabric and colors?” As soon as that idea crossed my mind I refused to answer it and continued with my old way of thinking: true creativity comes from using what you have in a beautiful way.
This wordy back-story leads us to my current project: creating something useful with scraps of yarn.
With all the knitting of mittens and hats that I do I’ve ended up with small balls of fingering weight yarn. My basket of scrap yarns look like a hodgepodge of colors that don’t go together. I wrote the pattern Using Up Scraps to literately use up my scraps.
You need 10 colors to make this hat: 11 grams of a main color plus 4 grams of 9 more colors. I used a kitchen/postage scale to weigh the yarn to make use I have enough. I arranged the yarn in a circle so I can see how it looks and I took a picture with my phone so I wouldn’t forget the order. These balls of yarn are so small I didn’t want to make a sample, although a person could if you have enough yarn.
There are many ways to use color in this hat. You could try to contrast light and dark with each color change or you could make the gradient change like the blue/green hat.
For this written pattern I used the color chart for the brown/green hat. You will need to substitute your own yarn colors. Here is the FREE pattern for anyone who would like to make it.
Sometimes I think “maybe I’ll keep these for myself” when I’m designing mittens. I usually give away the hats and mittens I make to people whom I determine are likely to handwash them. I ask people “what color is your coat?” to get an idea of what mittens they might like and use. Well, my coat is navy blue so I think I’ll keep these for myself.
For Icy Flowers I carried on with the flowers and swirlies motif that I’ve focused on lately. And like my other mittens I went with a checkerboard thumb and palm. These have a tight cuff that fits under your coat. They are worked from 5 charts. First the cuff chart, then a corrugated ribbing chart. After that the mittens are worked from 3 charts: The back of the hand, the palm, and the thumb gusset.
I’m posting this pattern for free here on my blog. If you make them I’d love to see your finished mittens. Please post on Ravelry or just send me a message.
If you follow my blog you might remember that I designed several mittens this past summer with the intentions of putting them out in the fall or winter. Jubilant Mittens were designed when I was in Homer Alaska visiting family. I had a series of poor designs where I thought I had a good idea and then after completing one whole mitten I look at it and say “nope” and chuck it. I actually did that a few time and then finally I came up with Jubilant Mittens and I like them.
When choosing colors I lay balls of yarn out on the table and then shuffle them around until I like what I see. Then I get on the computer and put the colors over a design that I’ve worked out. Then I shuffle the colors around on the computer until I settle on what I like. With Jubilant Mitten, I settled when I was halfway between switching from one color combo to another. I stopped doing the switch, looked and the screen, and said “that’s it”. I hadn’t thought of putting that turquoise-leaning blue with that olive-leaning green before it appeared on my computer screen.
Here’s the FREE pattern that I wrote for this project.
While my Achilles is “knitting” itself back together I’ve been doing a lot of knitting. (It’s a partial tear so no surgery needed.) I’ve had some time on my hands to work out a glove pattern that I had been imagining. I used the calculations from the glove pattern I wrote called Warming Up Gloves then added some colorwork.
I call these Evening Gloves. The main color is Asphalt Heather—a really dark gray that Knit Picks makes in a fingering weight. The Fuchsia color has been in my yarn stash for years and I never found a way to use it until now.
It’s funny that I used my least favorite color -pink- in the last pattern I put out too.
Here is the FREE pattern to download. If you make them please show me–either on Ravelry or just send me a message. Enjoy!